

Before you import
- The file must be a CSV. The upload accepts
.csvfiles only. If your list is in Excel, save it as CSV first. - At most 1,000 contacts per import. Split a longer list into several files.
- One email per contact. An email address can belong to only one contact in your store. A row whose email already belongs to a different contact is skipped.
Import step by step
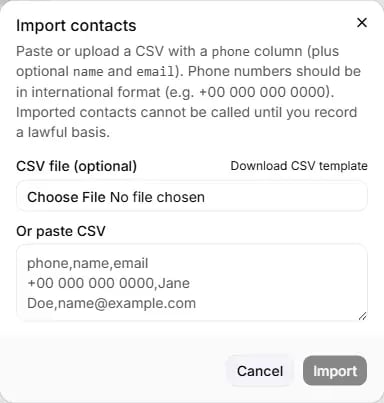
The Import contacts dialog, with a CSV pasted and the preview line underneath.
Open the dialog
Add your file
Read the preview
Choose a lawful basis (Import with consent only)
Import
Every field in the dialog
- Cancel closes the dialog. Nothing is imported.
- Import (or Import + record consent) runs the import. It stays greyed out until at least one contact is ready, the file is within the 1,000 limit, and, for Import with consent, a basis is chosen and any required statement is ticked.
How your CSV is read
The header row. If the first row names a phone column, it is treated as a header. Columns can be in any order. Names are matched ignoring upper and lower case, and spaces or hyphens count as underscores, so “Phone Number”, “E-mail” and “First Name” all work.- Values in quotes can contain commas, line breaks and doubled quotes.
- Fully blank lines are ignored.
- A row with no phone value is skipped and counted.
- If the same contact is in the file twice, it counts once when you import with consent.
A sample file
order_number.
Custom fields
Every column that is not phone, name or email becomes a custom field, named after its header. Your agent can use it on an outbound call as a variable: a column calledorder_number is available as {{order_number}}. The
preview lists the custom fields it found, and reminds you that re-importing a contact replaces its custom fields.
Naming rules for a custom field:
- letters, numbers and underscores only;
- must start with a letter or an underscore;
- at most 64 characters;
- must not start with
system__or_ri_; - must not be
customer_nameor a small number of other reserved names.
- A value can be at most 512 characters. A longer value is rejected, not shortened.
- A contact can hold at most 30 custom fields.
- Fields that are rejected are counted in the result message (“custom field(s) ignored”).
- A second column that is just another name for phone, name or email (for example a “Mobile” column next to “Phone”) is ignored, so phone numbers never end up in a custom field.
- If two headers have the same name, the first one is used.
- Blank cells are skipped.
What happens to contacts you already have
A contact is matched by phone number. Importing a number you already have updates that contact rather than creating a second one.- Name and email are written only when the file has a value. A blank cell never erases a name or email you already have.
- Custom fields: if the row has at least one custom value, the contact’s custom fields are replaced by the row’s set. If the row has no custom values, the stored ones are left alone.
- Opt-outs and the do-not-call list are never touched by an import. Someone who opted out stays opted out, even if you import their number again.
- A plain import never changes consent. An import with consent records the basis you chose, replacing any earlier calling basis for those numbers.
Import with consent
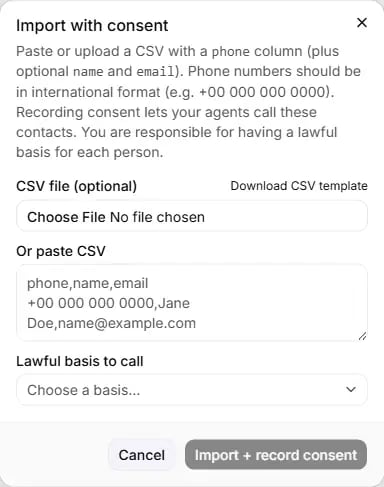
Import with consent: the same dialog, with the lawful basis picker.
- Each phone number is converted to international format. A leading
00counts as+, and spaces, dashes and brackets are removed. - A number that cannot be converted, including a number with no country code, is skipped and counted as “invalid number”.
- Each contact is added or updated, and the basis is recorded with today’s date.
- One record of the import is kept: who did it, which basis, how many contacts and, for the two bases with a statement, the exact statement you confirmed.
- If no number in the file can be used, the import is refused.
Result messages
Showing, hiding and adding columns
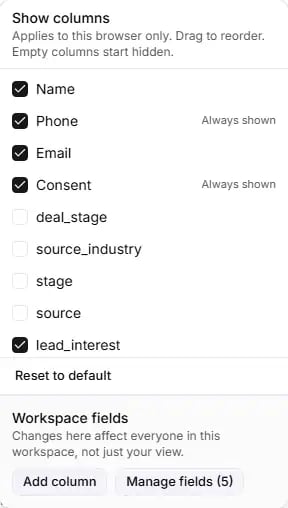
The Columns panel: your own view at the top, the workspace's fields at the bottom.
Show columns (your own view)
Anyone in the workspace can use this half. It appears once you have contacts.- Tick or untick a column to show or hide it. Phone, Consent and Actions are marked “Always shown” and cannot be hidden.
- Drag a row to change the order. Actions always stays last. Dragging works with a mouse; it does not work on touch screens or with the keyboard.
- Reset to default clears your choices and your order.
- By default, the built-in columns are shown, and a custom column is shown only when at least one contact on the current page has a value in it. Your own ticks override this either way.
Workspace fields (owners only)
The bottom half changes the columns for everyone: “Changes here affect everyone in this workspace, not just your view.” It is there even before your first import. Add column opens the Add a column dialog.- Type a name under Column name (for example
order_number). The same naming rules as custom fields apply. - If the name is not allowed you see “Use only letters, numbers, and underscores (and not a reserved name).”; if it is already a column, “That column already exists.”
- Click Add column. You see “Column added.” and the new column is switched on in your browser.
- If the name is refused, for example because it is reserved or you already have 30 columns, you see “That name is not a valid column and was ignored.”
{{order_number}}.
You fill in its value per contact with Edit on the Contacts page, or with a new import.
Manage fields (with the number of fields, for example “Manage fields (3)”) opens the Columns dialog, listing every workspace field.
- Click Remove next to a field, then Save. Nothing changes until you save. You see “Columns updated.”
- Removing a column does not delete the values stored on your contacts. Adding the column back shows them again.
Common questions
Can I import an Excel file?
Can I import an Excel file?
What columns does my CSV need?
What columns does my CSV need?
How many contacts can I import at once?
How many contacts can I import at once?
Why were some rows skipped?
Why were some rows skipped?
I imported my customers, but nobody gets called.
I imported my customers, but nobody gets called.
I re-imported a file and some custom data changed.
I re-imported a file and some custom data changed.
Can I re-import someone who opted out to make them callable again?
Can I re-import someone who opted out to make them callable again?
Can I import WhatsApp consent in bulk?
Can I import WhatsApp consent in bulk?
I added a column but I cannot see it.
I added a column but I cannot see it.
I removed a column. Is the data gone?
I removed a column. Is the data gone?
Can a member of my team import?
Can a member of my team import?