

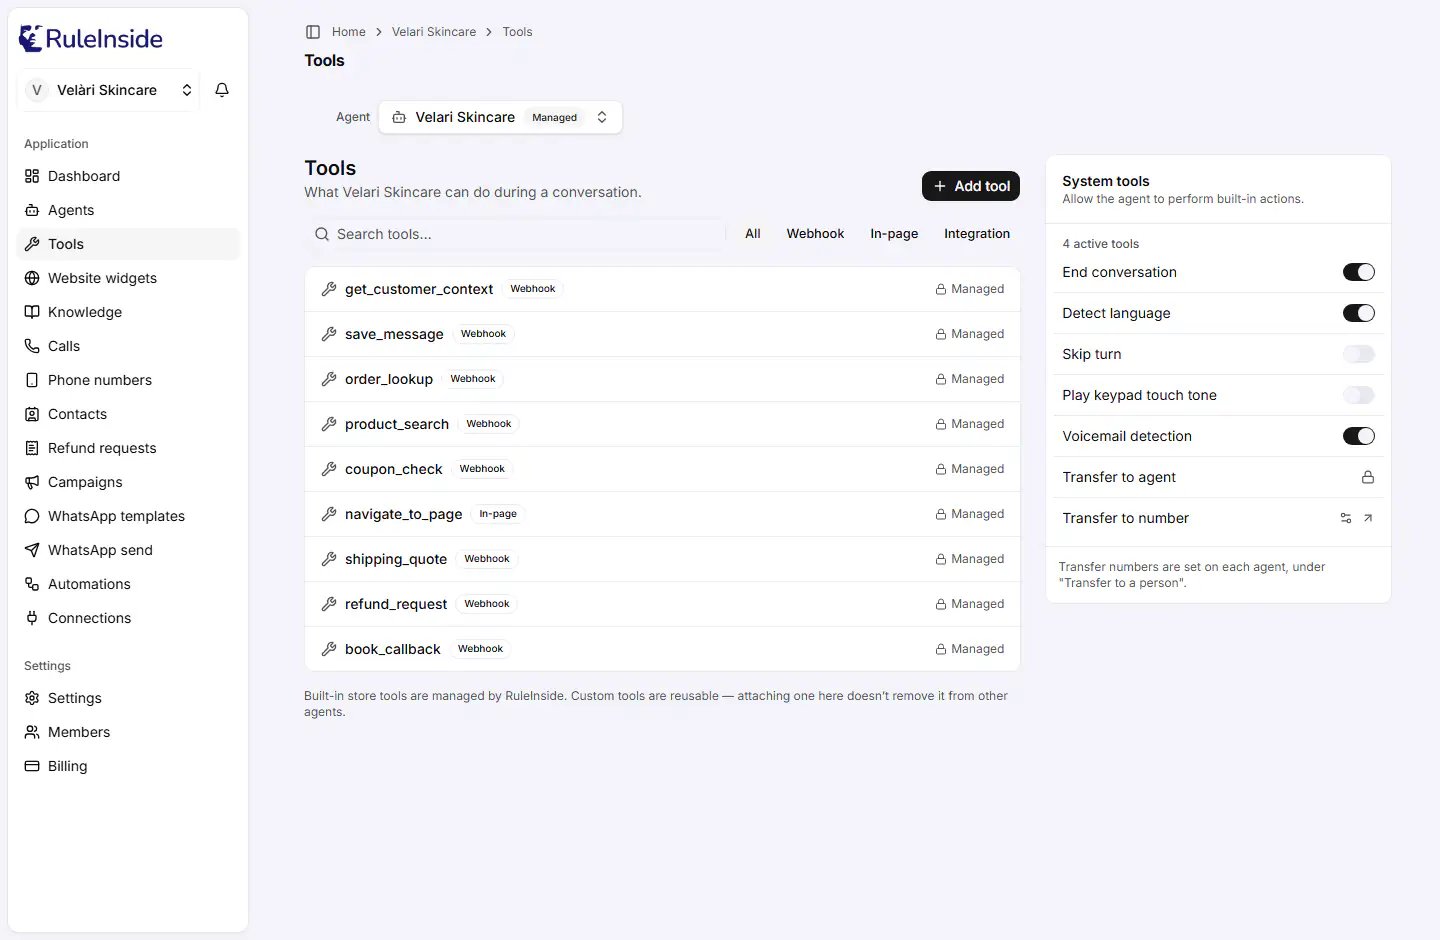
The Tools page: tools on this agent on the left, system tools on the right.
Who can change tools
Any member can see this page. To change anything you need both:- to be an owner of the account, and
- the active agent to be at Full control (see Edit levels). Agents you create are always at Full control; your main agent often is not.
The tools list
The page title reads “What … can do during a conversation.” with your agent’s name. Above the list:- Add tool (only when you can change tools).
- A search box, Search tools…, which matches names and descriptions.
- Filters: All, Webhook, In-page, Integration. They also apply to RuleInside’s tools.
- RuleInside’s store tools on the agent (such as product search, order look-up and coupon check), each with a padlock and Managed. You cannot change or remove them, and they always stay on the agent.
- Your custom tools attached to this agent, with their name, type, description and URL (for Webhook and Integration tools), and the buttons Remove, edit (pencil) and delete (trash).
- Available to attach (only when you can change tools): your custom tools that are not on this agent, each with Attach, edit and delete.
Buttons on a custom tool
Messages you may see:
- Attach or Remove failed: “Could not update tools.” (or the reason), and the page reloads.
- On your main agent below Full control: “This agent is managed, custom tools can only be attached to your own agents.”
- Delete: “Tool deleted.” or “Could not delete the tool.”
- Edit could not open: “Could not load the tool.”
Adding or editing a tool
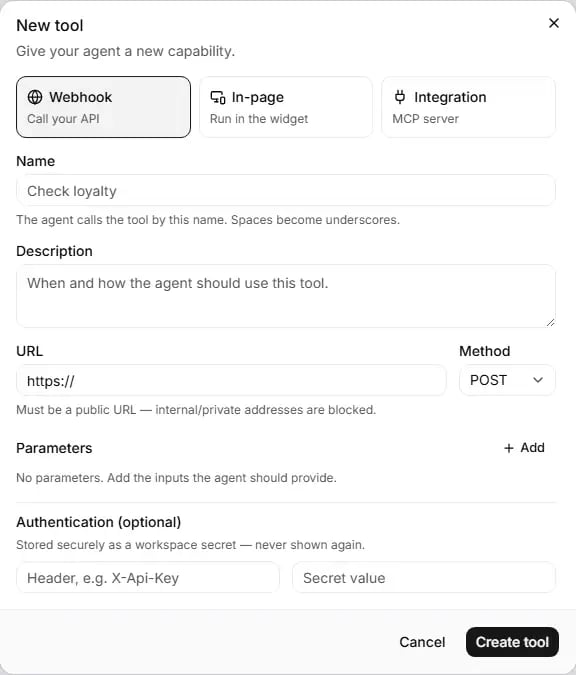
The New tool dialog, with the three tool types.
- Webhook (“Call your API”): the agent calls an address on your server.
- In-page (“Run in the widget”): the tool runs inside your website assistant.
- Integration (“MCP server”): connects an MCP server.
Fields for every type
A name reserved by RuleInside is refused. A tool may not refer to RuleInside’s reserved identity or system
variables (such as names starting with
system__) in its name, description, URL, header or parameters; the
message says “Tools may not reference reserved identity or system variables”.
Webhook fields
Parameters. Click + Add to add a row (“No parameters. Add the inputs the agent should provide.” while
there are none). Each row has:
- a name box (placeholder “param_name”), converted like the tool name;
- a type: string, number, integer or boolean;
- from variable (optional): when filled, the value comes from that conversation variable instead of from the agent, and req is greyed out. RuleInside’s reserved variable names are refused;
- req: the agent must supply this value;
- a trash button to remove the row.
In-page fields
Parameters, as above. “In-page tools run inside the embedded widget and need a matching handler on your site to do anything. This is an advanced option.”Integration fields
“Every tool call requires approval by default. MCP integrations may require an upgraded plan.”
Integration tools must be switched on for your account by RuleInside; they are off unless we have enabled them.
An Integration tool cannot be edited after it is created: delete it and create it again.
Saving the dialog
Click Create tool (“Creating…”) or, when editing, Save changes (“Saving…”). Cancel closes the dialog without saving.- A new tool is created and attached to the active agent in one step: “Tool created and attached.” If the tool is created but cannot be attached, it appears under Available to attach; click Attach there.
- An edit shows “Tool updated.” and changes the tool on every agent it is attached to.
- Failures show the reason, or “Could not create the tool.” / “Could not update the tool.”
System tools
The System tools panel on the right reads “Allow the agent to perform built-in actions.” and shows how many are active, including the transfer tools when they are on. Five switches: End conversation, Detect language, Skip turn, Play keypad touch tone and Voicemail detection.- Each switch saves as soon as you click it: “Updated.” or “Could not update.” (the page then reloads).
- Only an owner can use them, and only on an agent at Full control. Otherwise they are greyed out with “This agent is managed, its system tools are configured by RuleInside.” or “Only account owners can change these, ask an owner of your team.”
- Voicemail detection also decides what When a call reaches voicemail shows under Call limits.
Transfer rows
- Transfer to agent: always locked. Only RuleInside sets it up.
- Transfer to number: shows a settings icon when the agent has transfer numbers. When the agent editor shows the Transfer to a person card, the row links to it, with an arrow if you can change transfers there (an owner, with the agent at Instructions or above) or a padlock if you cannot. “Transfer numbers are set on each agent, under “Transfer to a person”.” See Transfer to a person.
What you might see
Row buttons are greyed out while an attach, delete or load is running.
Common questions
Can I change or remove order look-up or product search?
Can I change or remove order look-up or product search?
No. RuleInside’s store tools are marked Managed and always stay on the agent.
I deleted a tool by mistake
I deleted a tool by mistake
There is no undo. Create the tool again, including any authentication value, and attach it to each agent that
used it.
My webhook URL is refused
My webhook URL is refused
It must start with
https://, use a public domain name (not an IP address or localhost), and contain no user
name or password.Can I use one tool on two agents?
Can I use one tool on two agents?
Yes. Choose the other agent in the selector and click Attach on the tool. Editing the tool later changes it
on every agent.
What is the difference between Remove and Delete?
What is the difference between Remove and Delete?
Remove takes the tool off this agent only and keeps it for your other agents. Delete (the trash button)
erases it from every agent, straight away and for good.
Where can I see my API key again?
Where can I see my API key again?
Nowhere. Secret values are never shown again. To change it, edit the tool and type a new value.
How do I set transfer numbers?
How do I set transfer numbers?
In the agent editor, under Transfer to a person. The Transfer to number row on this page links there.
Can I edit an Integration tool?
Can I edit an Integration tool?
No. Delete it and create it again.
I switched on a system tool but it seems to have switched back off
I switched on a system tool but it seems to have switched back off
If you see “Could not update.”, the change was not saved and the page reloaded with the current value. Check
that you are an owner and that the agent is at Full control.