

Who can do what
- Everyone on your team can open the widgets list and every widget, and read all its settings.
- Only the owner can create a widget, change its settings, switch it on or off, rotate its embed id or delete it. Members see the settings greyed out, without the buttons that change something, and a note that only account owners can add or change widgets.
The widgets list
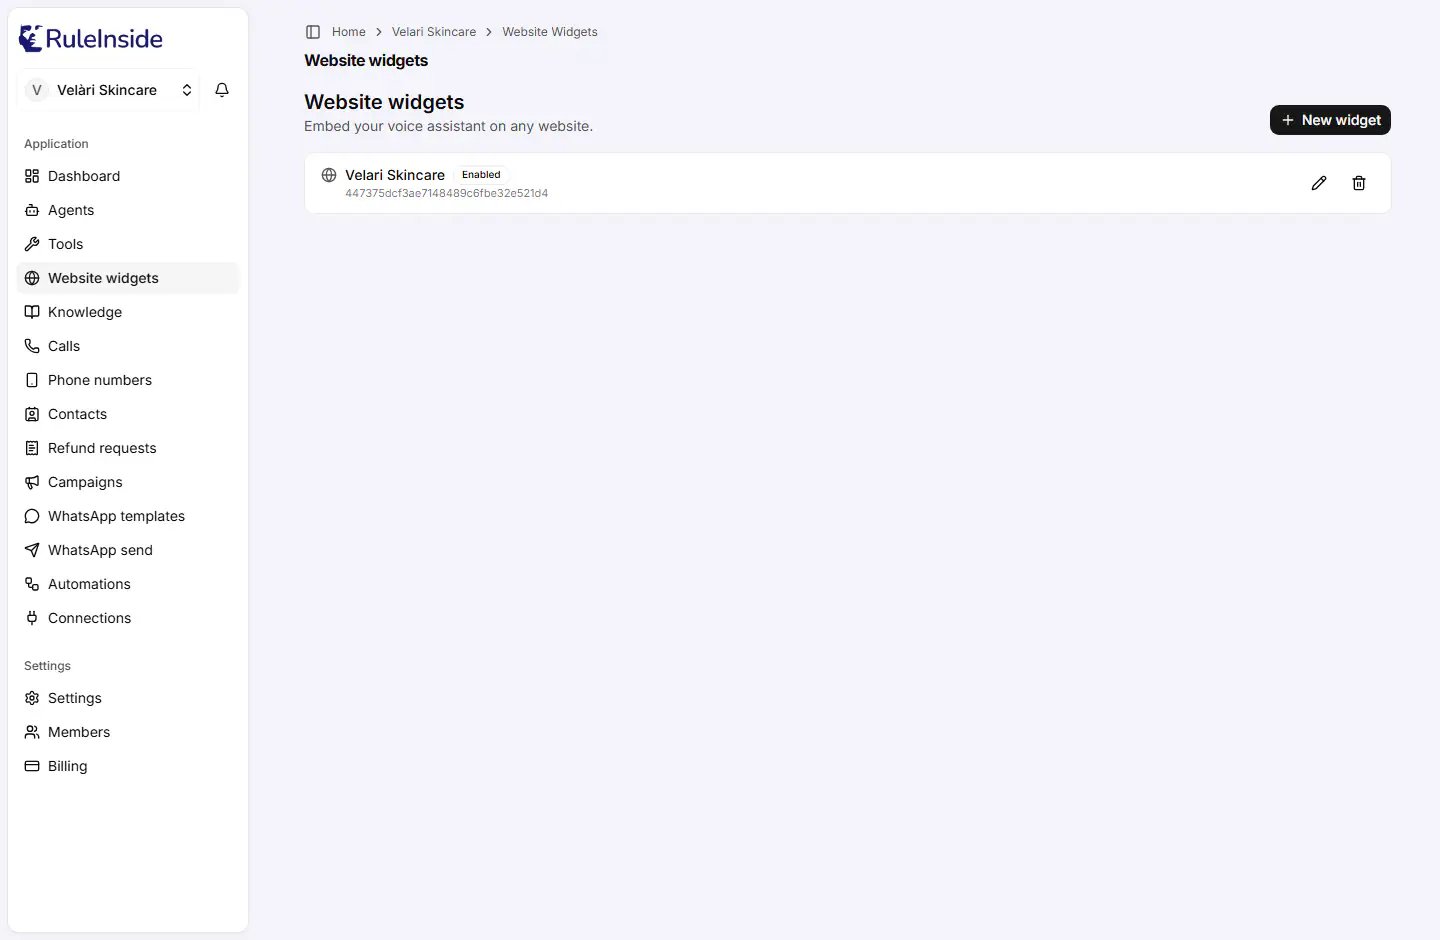
Website widgets: one row per widget, with its status and embed id.
- the agent’s name (if your agents could not be loaded, the row shows “Agent” instead);
- a status badge: Enabled (the widget is switched on) or Disabled (it is switched off and shows nothing on your website until you switch it back on);
- the embed id, in small grey letters: the identifier inside your snippet that says which widget to load (the WordPress plugin calls it Widget ID);
- a pencil icon (Edit widget) that opens the widget editor;
- a bin icon (Delete widget), for the owner only.
Creating a widget
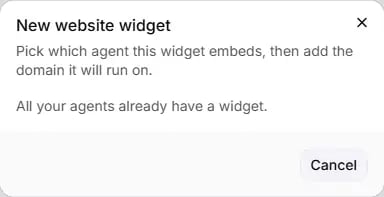
The New website widget dialog.
1
Click New widget
The New website widget dialog opens. Only the owner sees this button.
2
Choose the agent
Agent lists only the agents that do not have a widget yet. The first one is selected by default.
3
Enter the allowed domain
Allowed domain is the website the widget may appear on, for example
https://shop.example.com. It starts
filled with https://. You can add more domains later in the editor. If you leave it as https:// or blank,
the widget is created with no allowed domain and appears nowhere until you add one.4
Click Create widget
The widget is created switched on, and its editor opens so you can copy the snippet and set it up.
- “You need an agent first.” with a Create one link: create an agent first.
- “All your agents already have a widget.”: every agent already has its widget. Create another agent if you want a second, differently set up widget.
You also see a message if your account is not active, or if a domain is not accepted (see
Allowed domains).
The widget editor
Click the pencil on a row to open the editor (page title Website widget). The settings are on the left and a Live preview is on the right.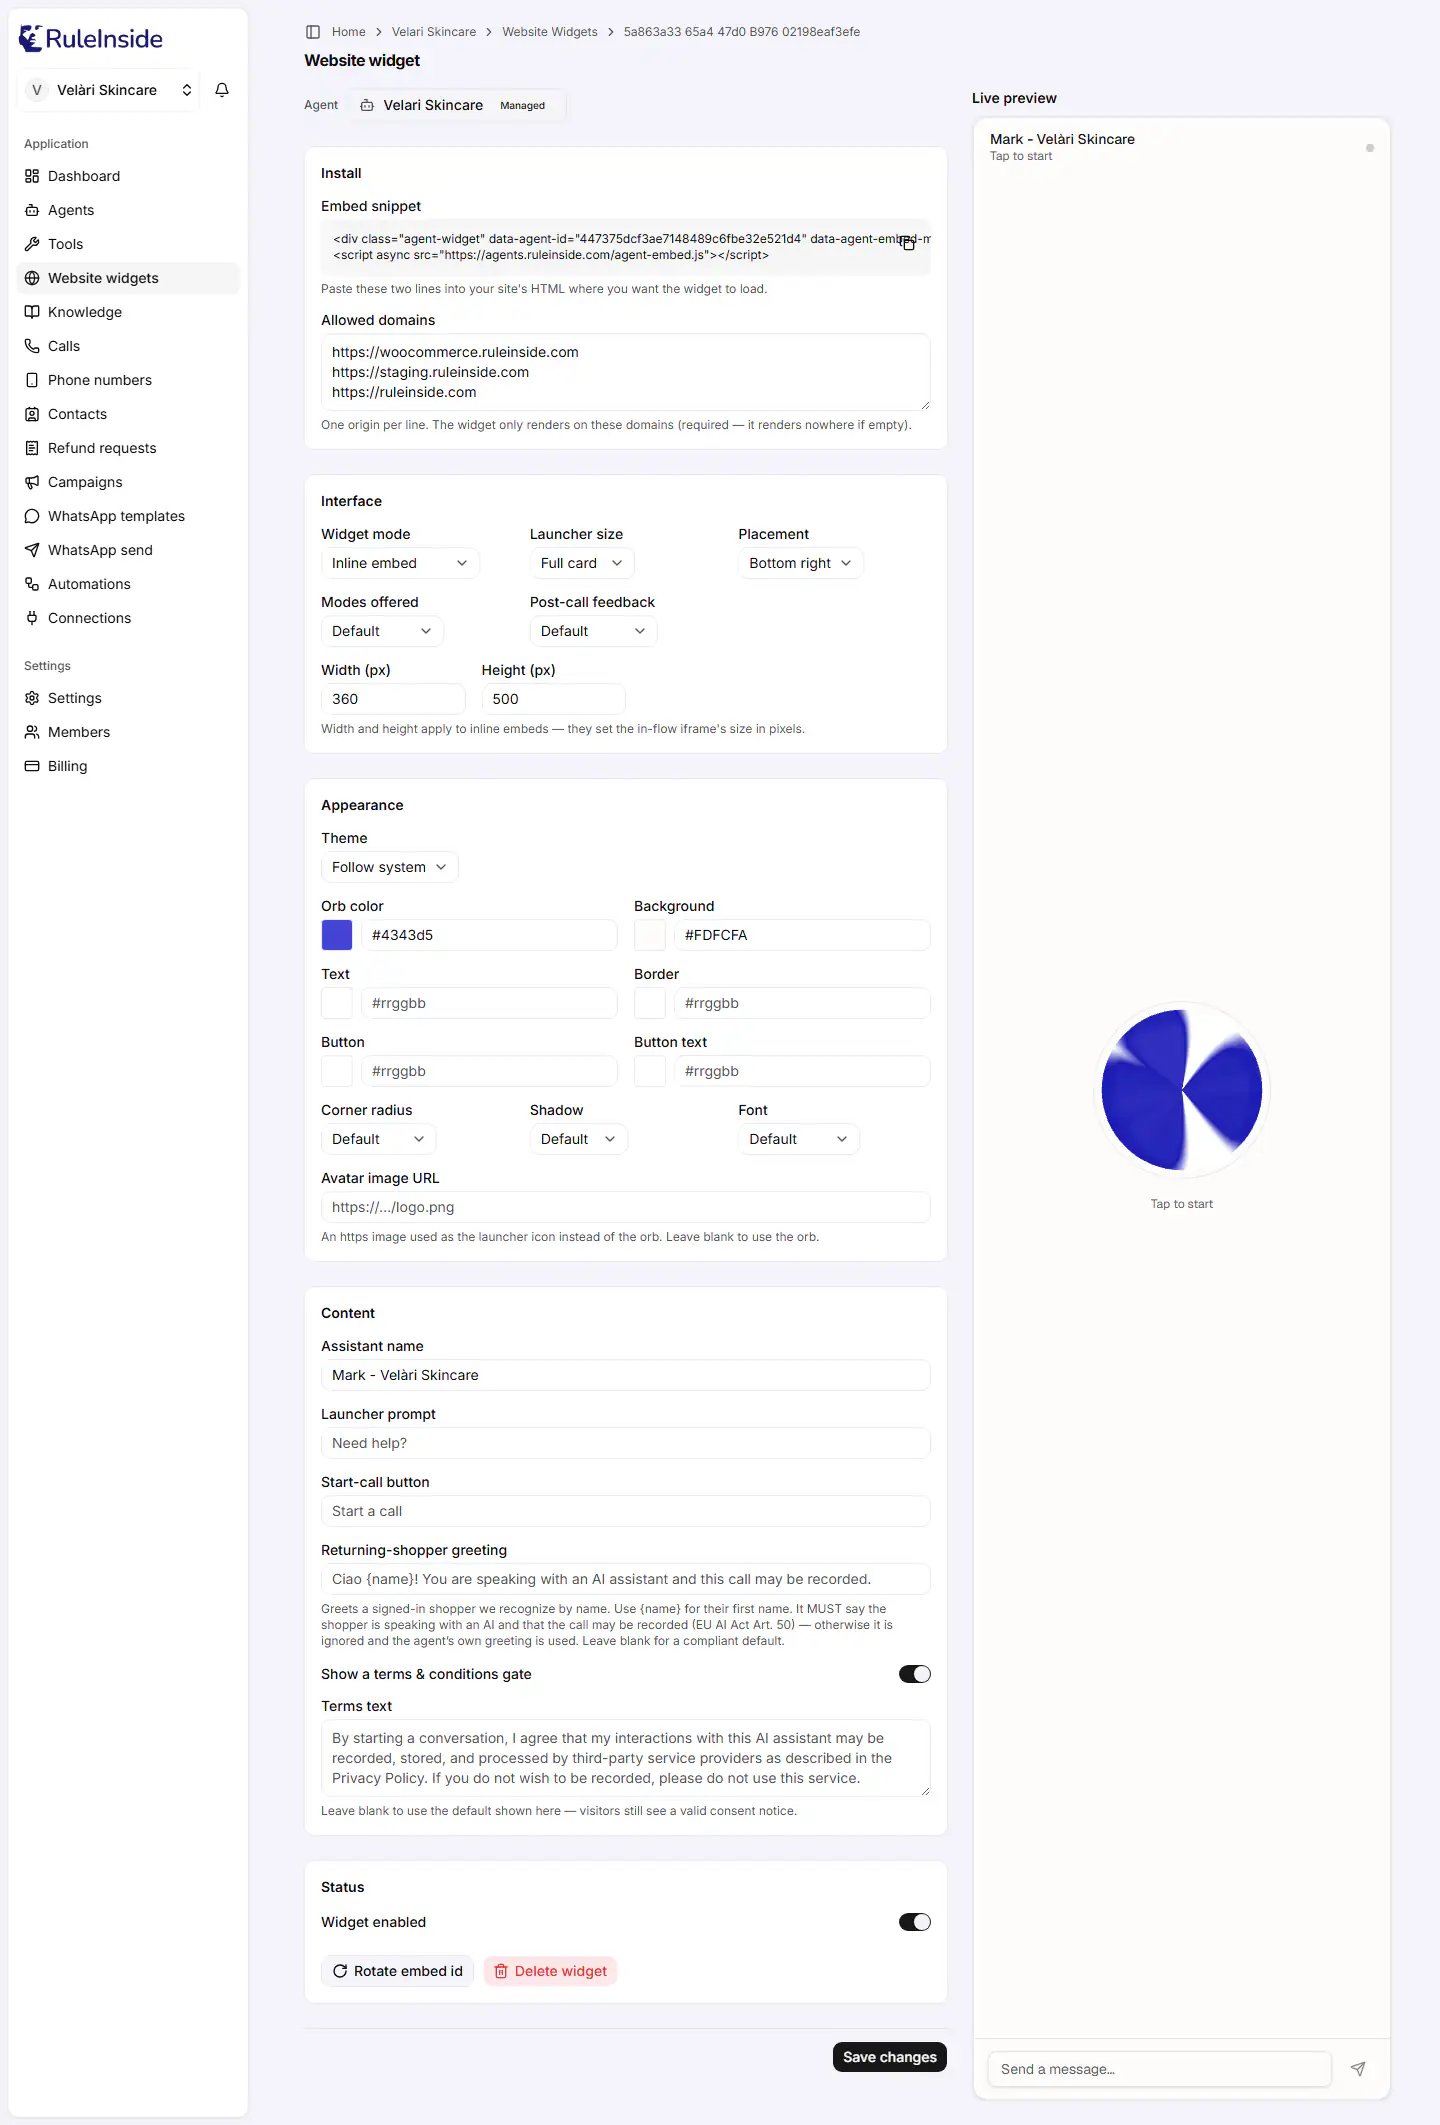
The widget editor, with the live preview on the right.
How saving works
Nothing you change in the editor takes effect until you click Save changes (bottom right). You then see “Saved.”, or a message that says what to fix (for example a colour or a domain). The only buttons that act straight away are Rotate embed id and Delete widget, after you confirm them. Every drop-down starts with Default, which means “use the widget’s built-in value”.Install
Embed snippet (read only) holds the two lines you paste into your site’s HTML, where you want the widget to load. It looks like this, with your own embed id:- Copy snippet is the copy icon at the top right of the box. It copies both lines, and the icon turns into a tick for two seconds. Members can copy the snippet too; only the settings below it are greyed out for them.
- With Widget mode set to Inline embed, the first line also carries the inline mode and, if you filled them in, the width and height. So changing Widget mode, Width (px) or Height (px) changes the snippet itself: paste the new snippet onto your site after saving.
Allowed domains
Allowed domains lists the websites the widget may appear on, one per line, for examplehttps://shop.example.com. The widget only shows on these websites. If the list is empty, it shows nowhere.
Messages you may see: “Enter a full origin like https://shop.example.com.”, a message that the address must use
https, or a message that it must not include a path, query or fragment.
The widget also refuses to open on its own in a browser tab: it only works inside a website that embeds it.
Interface
Enter Width (px) and Height (px) as plain numbers, such as
600. A value with letters, such as 600px, is
ignored when you save. A number outside the range is refused with a message such as “Too big: expected number to
be <=1200”.
If you change Widget mode but do not paste the new snippet, your website keeps the layout of the snippet that is
already on the page.
Appearance
Each colour must be a 6-digit hex colour, such as
#1a2b3c, or you see “Use a 6-digit hex color like #1a2b3c.”
You can type it or pick it from the swatch.
If Button and Button text are too close to read easily, you see “Low contrast between the button and its
text”. It is a warning only: you can still save, but shoppers may find the buttons hard to read.
Content
The returning-shopper greeting
This greeting welcomes a signed-in shopper your store recognises, by name. Write{name} where their first name
should go. It is used only when a recognised shopper starts a voice conversation, never for guests and never
for text chats.
The greeting must tell the shopper both that they are speaking with an AI and that the call may be recorded.
To count, it needs:
- an AI mention: “AI”, “A.I.”, “artificial intelligence”, “virtual assistant” or “automated assistant” (Italian “IA”, “assistente virtuale” and “intelligenza artificiale” also count);
- a recording mention: any word containing “record” (or, in Italian, “registrat”).
{name} are removed
before the greeting is spoken.
Status
- Widget enabled: switch it off and click Save changes to stop the widget showing on every website at once. The embed id stays the same, so switching it back on brings the widget back with no change to your website.
- Rotate embed id (owner only): creates a new embed id. You are asked to confirm (“Rotate the embed id?”). Afterwards a message reminds you to update the snippet on your site.
- Delete widget (owner only): deletes the widget after you confirm, then returns you to the list.
Deleting a widget
Click the bin icon on the list, or Delete widget in the editor, and confirm (“Delete this widget?”). You see “Widget deleted.” Deleting an agent also deletes its widget.The live preview
The right side of the editor shows Live preview: the real widget, updated a moment after each change, without interrupting a conversation in progress. Width (px) and Height (px) are not shown in the preview. The preview is a real conversation with your agent. Your browser asks for microphone access, and messages you type are really sent. Like a conversation on your website, it needs the widget switched on, your account active and on a paid plan, and it counts towards the daily conversation limit.Limits that protect your widget
- 30 conversation starts a minute for each widget. Above that, new conversations cannot start until the minute is over.
- A daily number of conversations for your account, shared by all your widgets and set from your plan. The day resets at midnight UTC, not at your local midnight. Your portal notifies you when half of the day’s conversations are used and when all of them are; new conversations then start again the next day. See Plans, limits and what happens at the limit.
- If you see “Your website assistant is paused. Contact support to turn it back on.”, contact us.
Common questions
I pasted the snippet and nothing shows
I pasted the snippet and nothing shows
Check these in order:
- Is the exact address of your site, starting with
https://, listed in Allowed domains? - Is Widget enabled switched on, and did you click Save changes?
- Was the embed id rotated after you pasted the snippet? Then paste the new one.
- Is your account active and on a paid plan?
- Did you reach today’s conversation limit? Look for a notification in your portal.
- Are you opening the widget’s own address in a browser tab? That is refused on purpose: open your website instead.
Can I use the widget on two websites?
Can I use the widget on two websites?
Yes. Add each website on its own line in Allowed domains (up to 25), save, and paste the same snippet on
each site.
Can I have two widgets for the same agent?
Can I have two widgets for the same agent?
No, each agent has one widget. If you want a second widget set up differently, create another agent for it.
Can I change which agent the widget uses?
Can I change which agent the widget uses?
No. Create a widget for the other agent and replace the snippet on your site.
I changed the colours but my site still looks the same
I changed the colours but my site still looks the same
Make sure you clicked Save changes. If you changed Widget mode, Width (px) or Height (px), the
snippet itself changed: copy it again and paste it onto your site.
I cleared a field and saved, but the old text came back
I cleared a field and saved, but the old text came back
Clearing a field does not reset it today. Type the wording or value you want instead, for example the default
wording listed on this page.
My greeting for returning customers is not used
My greeting for returning customers is not used
It must say both that the shopper is speaking with an AI and that the call may be recorded, using the words
listed under The returning-shopper greeting. Otherwise your agent’s own first
message is used. It is also used only for signed-in shoppers your store recognises, and only for voice.
How do I stop the widget for a while without losing it?
How do I stop the widget for a while without losing it?
Switch Widget enabled off and click Save changes. Switch it back on later: the snippet on your site does
not need to change.
Why can't I change anything?
Why can't I change anything?
Only the owner of the account can change widgets. Ask an owner of your team.