

Your Profile
Open Settings from the left sidebar, then the Profile tab. The cards appear in the order below.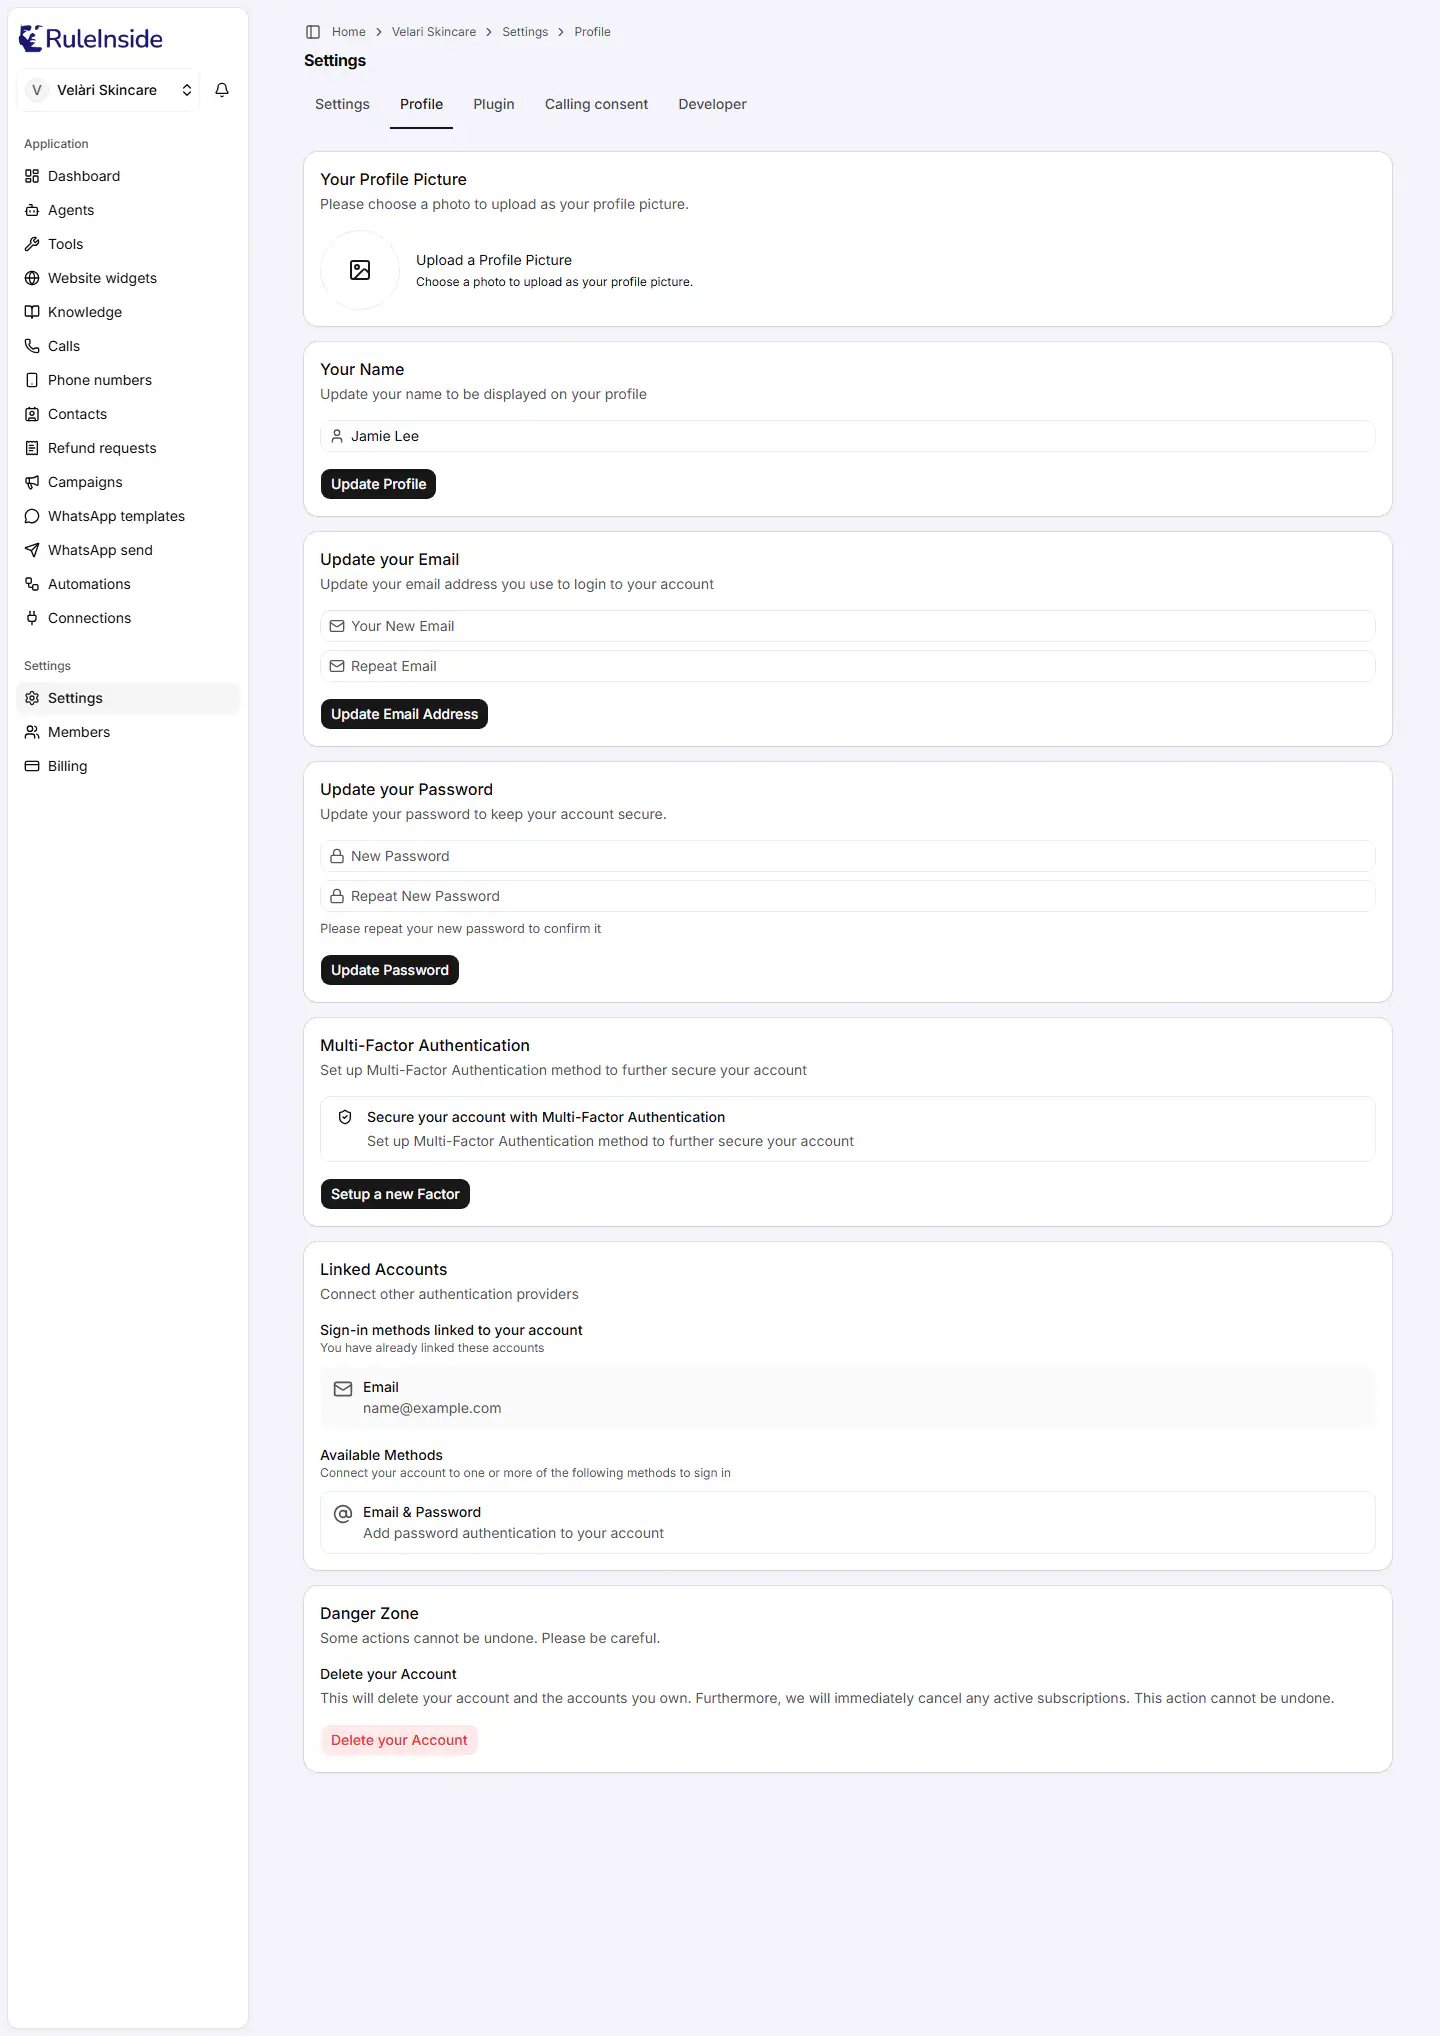
The Profile tab holds everything about you as a person, not your organization.
Your Profile Picture
Click Upload a Profile Picture and choose an image file. A new image replaces the old one; clearing it removes your picture. You see “Updating profile…” and then “Profile successfully updated”.Your Name
Type your name in the field and click Update Profile. It must be 2 to 100 characters. This is the name your colleagues see in the Name column on the Members page. Without a name, they see the part of your email before the@.
The portal is in English only, so there is no language setting.
Update your Email
1
Type the new address twice
Fill in Your New Email and Repeat Email. Both must be valid, must match, and must differ from your
current email.
2
Click Update Email Address
A green box confirms: “We sent you an email to confirm your new email address.”
3
Click the link in the email
Open your inbox at the new address and click the link.
Your email does not change until you click the confirmation link. Until then, keep signing in with your current
address.
Update your Password
Fill in New Password and Repeat New Password, then click Update Password. A green box says “Your password has been successfully updated!”- The password must be 8 to 99 characters, and the two fields must match.
- There is no “current password” field: being signed in is the proof that it is you.
- It cannot be the same as your current password.
- “This password is too weak. Use at least 8 characters and mix letters, numbers and symbols.” means you should choose a stronger one.
- If a yellow Reauthentication Required box appears, sign out, sign in again, and then change the password.
Multi-Factor Authentication (two-factor sign-in)
Two-factor sign-in adds a second check after your password: a 6-digit code from an authenticator app on your phone or from a password manager. The code changes every few seconds, so someone who steals your password still cannot get in.1
Click Setup a new Factor
In the Multi-Factor Authentication card, click Setup a new Factor.
2
Name it
In A memorable name to identify this factor, type a name you will recognise later, for example “iPhone”.
Click Set factor name.
3
Scan the QR code
Scan the QR code with your authenticator app or password manager.
4
Enter the code
Type the 6-digit code the app shows and click Enable Factor. You see “Factor successfully enrolled”.
Passkeys
If your Profile shows a Passkeys card, you can sign in without a password using your device’s fingerprint, face unlock or a security key.- Click Add a passkey and follow your browser’s prompt. You see “Passkey successfully registered”.
- Each passkey shows its name and “Added on” with the date.
- To delete one, click its X button (Delete this passkey) and confirm with Yes, delete passkey. You can no longer sign in with it.
- Once you have a passkey, the sign-in page offers Sign in with Passkey. A passkey signs you in to an account that already exists; it cannot create a new account.
Linked Accounts
Linked Accounts shows the ways you can sign in.- Sign-in methods linked to your account lists each method, for example “Email”, with its address. When you have more than one, Unlink Account removes one. Unlinking cannot be undone.
- Available Methods lists what you can add:
- Email & Password adds a password to your account. It is how someone who joined through an invitation link sets a password. It is shown when you have an email login but did not sign in with a password this time.
- Set Email Address adds an email, and appears only when your account has none.
- Sign-in with Google or other social accounts is not available.
Danger Zone: Delete your Account
Delete your Account permanently deletes your login and removes you from every organization you belong to.1
Click Delete your Account
A dialog with the same title opens.
2
Prove it is you
We email you a 6-digit code. Type it in to continue.
3
Confirm
Click Delete your Account. You see “Deleting account. Please wait…”.
Signing up
You sign up with an email and a password. Sign-in with Google or other social accounts is not available.- Open the sign-up page, Create an account.
- Fill in Email, Password (8 to 99 characters; the eye icon shows what you typed) and Repeat password.
- Tick “I accept the Terms of Service and Privacy Policy”. This is required.
- Click Sign up with Email.
- You see We sent you a confirmation email. Open it and click the link to verify your address.
Verifying your email
Clicking the link in the confirmation email signs you in. You land in your organization or, if you do not have one yet, on the page to create an organization. If the link does not work, you see Authentication Error with one of these messages:Signing in
- On Sign in to your account, enter your email and password.
- Click Sign in with Email.
- If you use two-factor sign-in, the page Verify your account asks for the 6-digit code from your app. With more than one factor, first choose which one to use. Click Submit Verification Code.
- “The credentials entered are invalid”: the email or password is wrong.
- “Please confirm your email address before signing in”: click the link in your confirmation email first.
- Invalid Verification Code: the two-factor code was wrong or expired. Enter the current code.
Resetting a forgotten password
1
Ask for a reset link
On the sign-in page, click Forgot Password?. On Reset Password, type your Email Address and click
Reset Password.
2
Open the email
You see “Check your Inbox! We emailed you a link for resetting your Password.” Click the link in that email.
3
Choose a new password
Type the new password twice (8 to 99 characters) and click Reset Password. You see “Your password has been
successfully updated!” and go to your dashboard.
Accepting an invitation
When an owner or member invites you, you receive an email with a link.- Click the link. You are signed in automatically. If you do not have an account yet, one is created for your invited address.
- The page Join followed by the organization’s name appears, with its logo if it has one.
- Click Continue as followed by your email. You see “Joining organization…”.
- If your account is new, the page Link account to sign in asks you to add a sign-in method. Choose Email & Password to set a password, then click Continue.
If you skip step 4, the portal asks No authentication method added. You can continue, but your account then
has no password. Next time, use Forgot Password? on the sign-in page, or add one later under Profile,
Linked Accounts.
- Invite not found or expired: the invitation is more than 7 days old, was removed or was already used, or you are signed in with a different email from the one that was invited. Ask the person who invited you to renew it, or to invite the email you sign in with.
- A “page not found” message straight after clicking the link: usually the invitation has expired or been removed. Ask for it to be renewed or sent again.
- You are signed in as someone else: under the button, use Sign in with a different account, then sign in with the invited address.
- You are already a member: you go straight to your dashboard.
Creating an organization
If you belong to no organization, the portal takes you to Create your organization after you sign in.- Type an Organization Name. The rules are the same as for renaming: 2 to 50 characters, no special
characters, not
settingsorbilling. For names in other scripts, an Organization URL field also appears. See Organization settings. - Click Get Started.
Common questions
How do I turn on two-step sign-in?
How do I turn on two-step sign-in?
Settings, Profile, Multi-Factor Authentication, Setup a new Factor. Scan the QR code and enter
the code from your app.
I lost the phone with my authenticator app.
I lost the phone with my authenticator app.
The portal has no self-service way to remove a factor you cannot reach, and sign-in will keep asking for the
code. If your codes are in a password manager that syncs, use it on another device. Otherwise, contact us.
I changed my email but nothing happened.
I changed my email but nothing happened.
Click the confirmation link we sent to the new address. Your email changes only after that.
It won't let me delete my account.
It won't let me delete my account.
You are the primary owner of an organization. Transfer ownership on the Members page first.
Does deleting my account cancel our subscription?
Does deleting my account cancel our subscription?
No. Cancel the plan on Billing. Deleting your account never cancels billing.
Why is there no field for my current password?
Why is there no field for my current password?
You are already signed in, which proves it is you. If the portal needs a fresh sign-in, it tells you with
Reauthentication Required.
I joined through an invitation and never set a password.
I joined through an invitation and never set a password.
Add one under Profile, Linked Accounts, Email & Password, or use Forgot Password? on the sign-in
page.